Configuration
INFO
Wolverine uses the built in .NET ServiceProvider as its IoC container and does not replace it. It's theoretically possible to use other IoC containers as long as they conform to the .NET conforming container, but this isn't tested by the Wolverine team.
Wolverine 6.0: IoC registrations need to be transparent to codegen
Wolverine generates message-handler and HTTP-endpoint adapter code at startup. By default in 6.0, that codegen refuses to fall back to a runtime service locator — if you register a service with an opaque pattern (e.g. AddScoped<TInterface>(sp => new TImpl(...))), Wolverine will throw InvalidServiceLocationException at host startup. Prefer concrete-type registrations (AddScoped<TInterface, TImpl>()) for anything Wolverine needs to inject. See Working with Code Generation for the full story and the opt-in escape hatch.
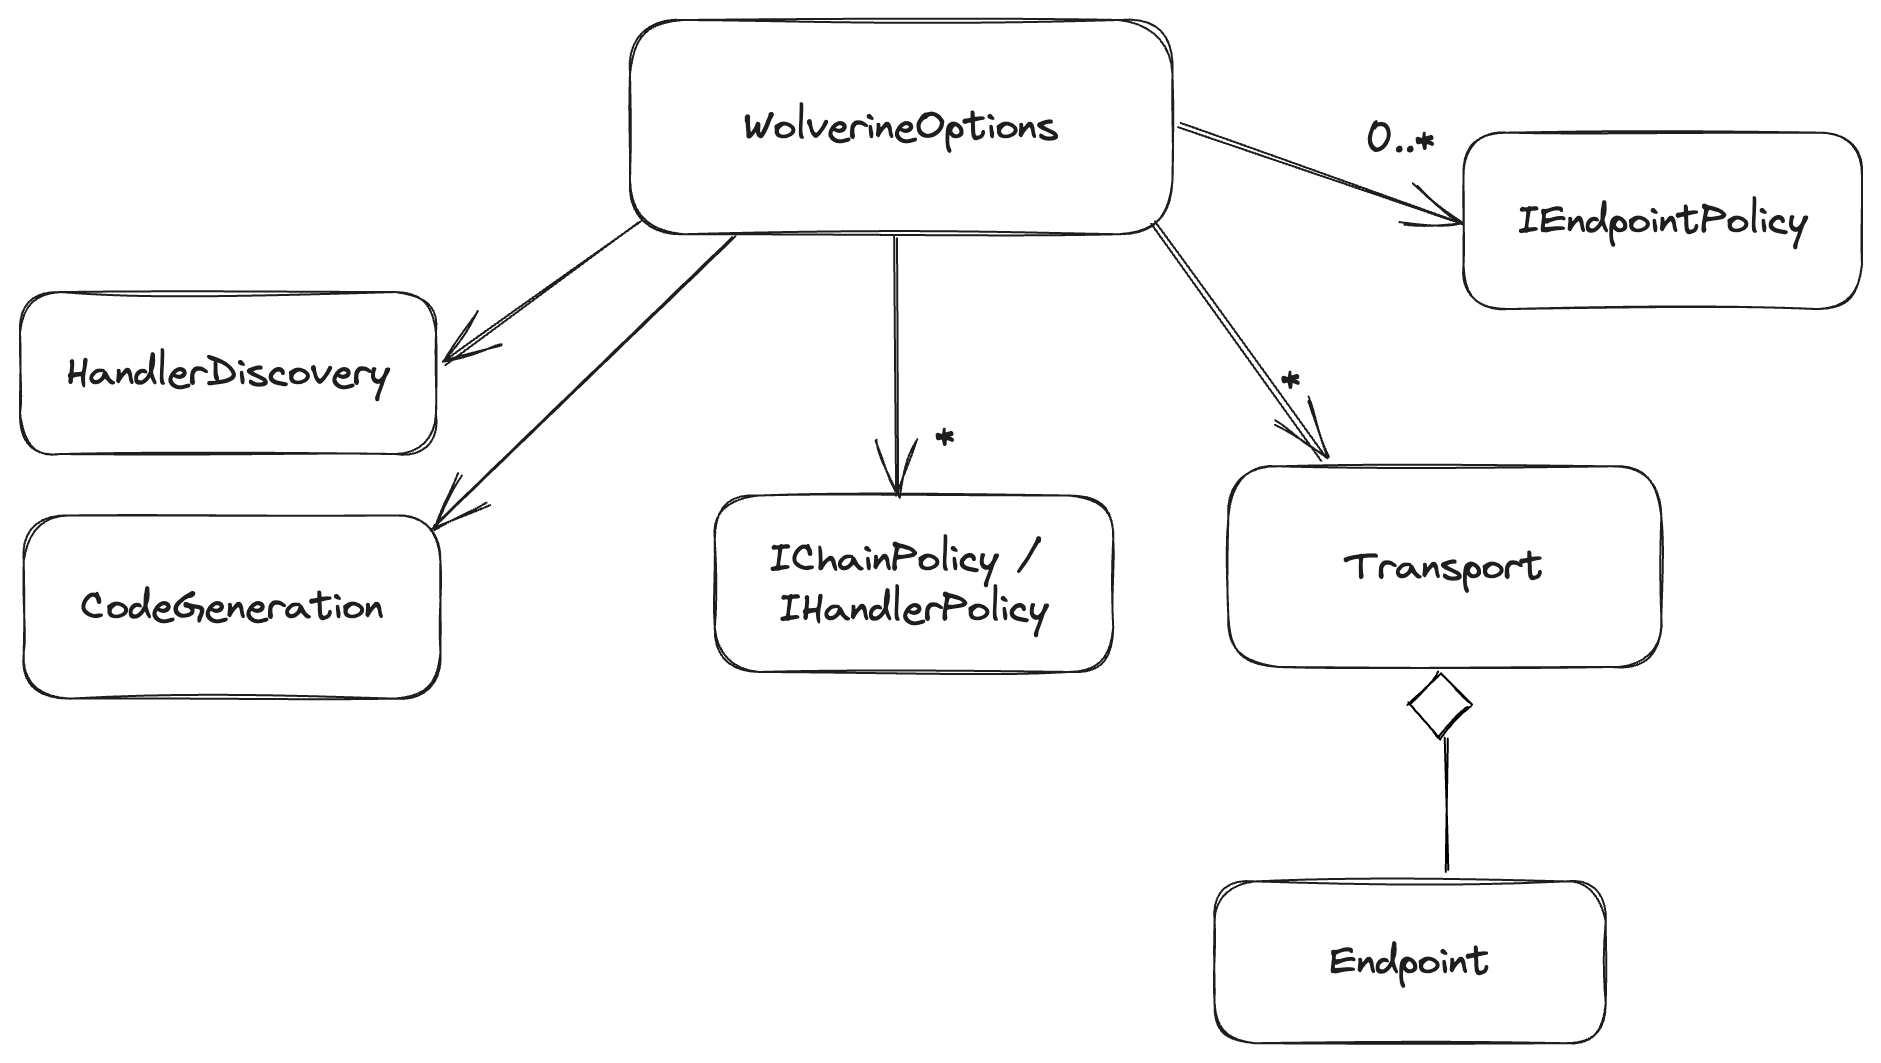
Wolverine is configured with the IHostBuilder.UseWolverine() or HostApplicationBuilder extension methods, with the actual configuration living on a single WolverineOptions object. The WolverineOptions is the configuration model for your Wolverine application, and as such it can be used to configure directives about:
- Basic elements of your Wolverine system like the system name itself
- Connections to external messaging infrastructure through Wolverine's transport model
- Messaging endpoints for either listening for incoming messages or subscribing endpoints
- Subscription rules for outgoing messages
- How message handlers are discovered within your application and from what assemblies
- Policies to control how message handlers function, or endpoints are configured, or error handling policies
With ASP.NET Core
INFO
Do note that there's some additional configuration to use WolverineFx.HTTP as well.
Below is a sample of adding Wolverine to an ASP.NET Core application that is bootstrapped with WebApplicationBuilder:
using JasperFx;
using Quickstart;
using Wolverine;

var builder = WebApplication.CreateBuilder(args);

// The almost inevitable inclusion of OpenApi:)
builder.Services.AddOpenApi();

// For now, this is enough to integrate Wolverine into
// your application, but there'll be *many* more
// options later of course :-)
builder.Host.UseWolverine();

// Some in memory services for our application, the
// only thing that matters for now is that these are
// systems built by the application's IoC container
builder.Services.AddSingleton<UserRepository>();
builder.Services.AddSingleton<IssueRepository>();

var app = builder.Build();

// An endpoint to create a new issue that delegates to Wolverine as a mediator
app.MapPost("/issues/create", (CreateIssue body, IMessageBus bus) => bus.InvokeAsync(body));

// An endpoint to assign an issue to an existing user that delegates to Wolverine as a mediator
app.MapPost("/issues/assign", (AssignIssue body, IMessageBus bus) => bus.InvokeAsync(body));

app.MapOpenApi();

app.MapGet("/", () => Results.Redirect("/swagger"));

// Opt into using JasperFx for command line parsing
// to unlock built in diagnostics and utility tools within
// your Wolverine application
return await app.RunJasperFxCommands(args);"Headless" Applications
TIP
The WolverineOptions.Services property can be used to add additional IoC service registrations with either the standard .NET IServiceCollection model syntax.
For "headless" console applications with no user interface or HTTP service endpoints, the bootstrapping can be done with just the HostBuilder mechanism as shown below:
return await Host.CreateDefaultBuilder(args)
    .UseWolverine(opts =>
    {
        opts.ServiceName = "Subscriber1";

        opts.Discovery.DisableConventionalDiscovery().IncludeType<Subscriber1Handlers>();

        opts.ListenAtPort(MessagingConstants.Subscriber1Port);

        opts.UseRabbitMq().AutoProvision();

        opts.ListenToRabbitQueue(MessagingConstants.Subscriber1Queue);

        // Publish to the other subscriber
        opts.PublishMessage<RabbitMessage2>().ToRabbitQueue(MessagingConstants.Subscriber2Queue);

        // Add Open Telemetry tracing
        opts.Services.AddOpenTelemetryTracing(builder =>
        {
            builder
                .SetResourceBuilder(ResourceBuilder
                    .CreateDefault()
                    .AddService("Subscriber1"))
                .AddJaegerExporter()

                // Add Wolverine as a source
                .AddSource("Wolverine");
        });
    })

    // Executing with Oakton as the command line parser to unlock
    // quite a few utilities and diagnostics in our Wolverine application
.RunOaktonCommands(args);As of Wolverine 3.0, you can also use the HostApplicationBuilder mechanism as well:
var builder = Host.CreateApplicationBuilder();
builder.UseWolverine(opts =>
{
    var connectionString = builder.Configuration.GetConnectionString("database");

    opts.Services.AddDbContextWithWolverineIntegration<SampleDbContext>(x =>
    {
        x.UseSqlServer(connectionString);
    });

    // Add the auto transaction middleware attachment policy
    opts.Policies.AutoApplyTransactions();
});

using var host = builder.Build();
await host.StartAsync();And lastly, you can just use IServiceCollection.AddWolverine() by itself.
Splitting Configuration Across Modules 5.0
To keep your UseWolverine() configuration from becoming too huge or to keep specific configuration maybe within different modules within your system, you can use Wolverine extensions.
You can also use the IServiceCollection.ConfigureWolverine() method to add configuration to your Wolverine application from outside the main UseWolverine() code as shown below:
var builder = Host.CreateApplicationBuilder();

// Baseline Wolverine configuration
builder.Services.AddWolverine(opts =>
{

});

// This would be applied as an extension
builder.Services.ConfigureWolverine(w =>
{
    // There is a specific helper for this, but just go for it
    // as an easy example
    w.Durability.Mode = DurabilityMode.Solo;
});

using var host = builder.Build();

host.Services.GetRequiredService<IWolverineRuntime>()
    .Options
    .Durability
    .Mode
.ShouldBe(DurabilityMode.Solo);Service-Level Tags 6.15
You can attach free-form, service-level tags to a Wolverine application through WolverineOptions.Tags. These are opaque strings — you own any key:value (or any other) convention — and they label the whole service rather than individual endpoints or messages:
builder.Services.AddWolverine(opts =>
{
    opts.ServiceName = "Orders";

    // Free-form, operator-defined labels for this service
    opts.Tags.Add("team:fulfillment");
    opts.Tags.Add("tier:critical");
    opts.Tags.Add("domain:orders");
});
The tags are surfaced on ServiceCapabilities.Tags, the diagnostic snapshot Wolverine exposes for monitoring tools. CritterWatch consumes them to let you group and filter related services on its dashboard by your own labels. They are distinct from any per-endpoint tagging — this is a single, service-wide set of labels.